How to Dewinterize Your RV in 15 mins [4 simple steps]
Posted on October 28, 2019
![How to Dewinterize Your RV in 15 mins [4 simple steps]](https://ghost-cdn.rvezy.com/2019/10/mew-lake-provincial-park-rv-camping-1.jpg)
Now that the snow is gone (finally!) it is time to look at preparing your RV for the upcoming season. Whether you own a travel trailer or motorhome, preparing the RV for the summer season is relatively similar with some small exceptions. + You can rent out your RV on RVezy.com and earn great money this summer.
Getting your RV ready and prepared first thing in the spring is an important step in regular maintenance and helps you identify any issues that developed over the winter months. It also provides an opportunity to do some preventative maintenance, prolonging the life of your investment.
In this article we will explore the steps required to dewinterize your RV when using the anti freeze method of winterization.
What is dewinterizing?
Dewinterizing refers to several processes for getting your RV out of storage and prepared for use in the spring, summer and fall seasons.
Over the winter months, with the sub freezing temperature, RV owners will take several precautions to ensure the RV does not sustain any damage. These steps generally include water line treatment, critter protection, and water damage protection.
RV Dewinterization Checklist
Before you begin, make sure you have:
- Fresh potable water
- RV-safe drinking water hose
- Basic gloves
- RV-safe bleach or sanitizer
- Water pressure regulator
- Basic hand tools
- Fully charged RV battery
Quick spring checklist:
- Flush antifreeze
- Sanitize fresh-water tank
- Refill water heater
- Check for leaks
- Inspect roof seals
- Test propane system
- Check batteries
- Inspect tires
- Test appliances
Here's what you need to know about dewinterizing your RV:
Fill your fresh water tank
Now that spring is coming, it is likely that you have opened the fresh water tank to prevent any water from remaining in the tank over the winter. Prior to filling the fresh water tank, you'll want to ensure that any plugs are replaced and tightened or any valves for draining are in the closed position.
Once this is completed, it is safe to fill your fresh water tank through the freshwater input.
Flush the antifreeze out of your water lines
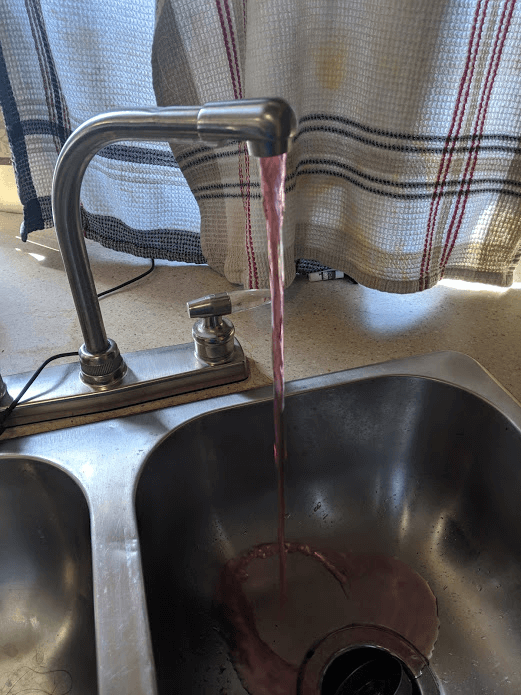
Pink antifreeze coming out of the kitchen tap
First, ensure that your fresh water pump is set to access the fresh water tank. You want to make sure that the water selection is set to the fresh water tank source. Some RVs have permanently installed winterizing valves.
Once the fresh water tank is full and the pump is properly directed to the fresh water reservoir, you are ready to flush the antifreeze out of the water lines. I personally start with the furthest water source in the RV, which is typically the bathroom.
The process is pretty simple: start by opening one tap at a time, first the cold water tap and then the hot water tap. Keep each running until the pink antifreeze finishes running out of the tap.
You will start to see the pink transition to the clear water from the fresh water tank. It is helpful to have a second person with you to ensure that there are no leaks at the pump or anywhere along the water line.
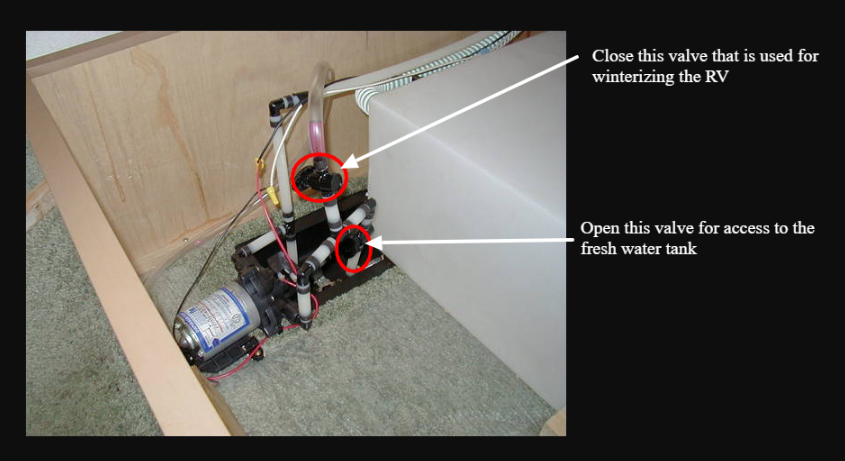
Example of closing winterizing valve and opening fresh water valve
Make sure to run all taps in the RV, including any outdoor showers, interior showers, and all faucets.
Fill the hot water tank
Once you are comfortable that all the antifreeze has been removed from the water lines, it’s time to fill the hot water tank with freshwater.
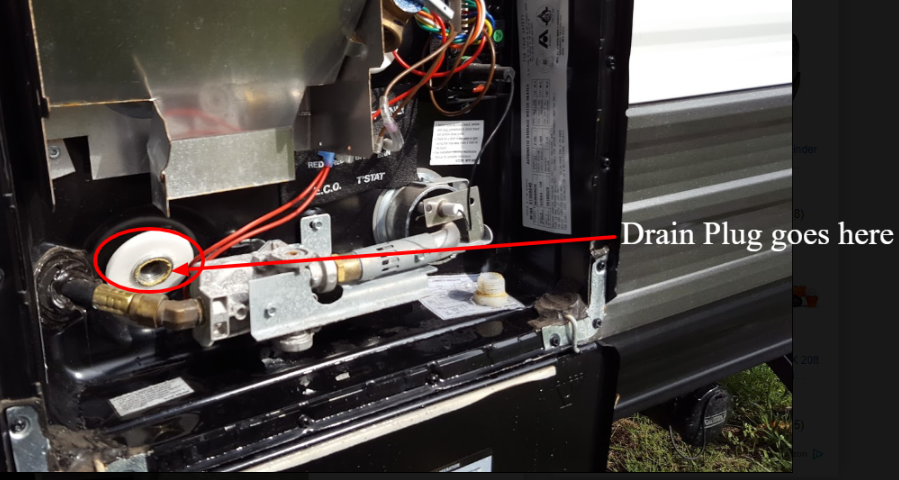
First, you will have to prepare the hot water tank. Ensure that you have securely attached the hot water tank drain plug. If you have an anode rod, consider replacing it if it appears to have deteriorated.
The drain plug for the hot water tank is accessible from the access door on the outside of the RV.
Once the drain plug is securely attached, it’s time to “un-bypass” the hot water tank. Accessing the backside of the hot water tank is typically done from the interior of the RV.
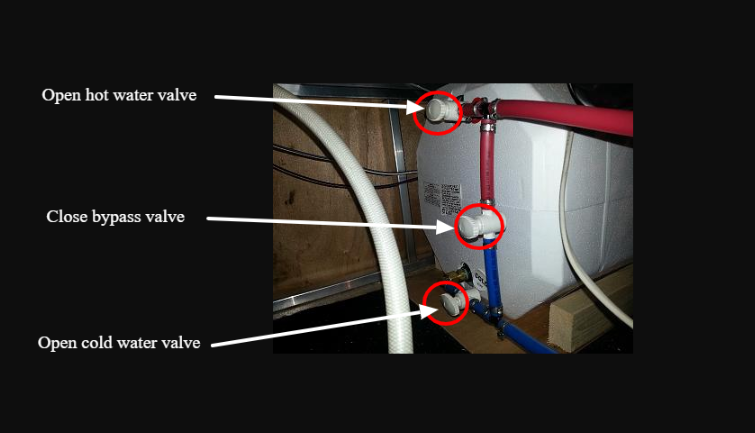
When preparing for the winter, the hot water tank is bypassed by closing the intake and output lines of the hot water tank and opening the valve connecting the hot water line to the cold water line. To prepare for the summer and fill the hot water tank, simply do these functions in reverse.
Open the bottom waterline valve for the intake of the water into the hot water tank, close the valve connecting the hot and cold water lines, and open the valve for the hot water line at the top of the hot water tank.
Final inspection
At this point you will hear the hot water tank fill with water. This is another great time to check the pump and the exterior of the hot water tank to ensure that there are no leaks present. Once the hot water tank is full and all taps are closed, the water pump will stop running and you are all finished.
This entire process can be done in about 10-15 minutes and requires limited skill and experience. Once you are familiar with the process and have done it a couple of times, you’ll be very efficient at the whole process. Once your water system is ready for the summer, you’ll find that this would also be a great time to test all other systems including propane, hot water and other electrical components.
FAQs
How do you de-winterize an RV?
RVezy's de-winterization guide covers 7 steps: flush antifreeze, sanitize the fresh-water tank, check tires, test propane, inspect roof seals, replace batteries, and test appliances. About 40% of RVs develop plumbing issues from incomplete de-winterizing. RVezy hosts do this before peak season.
How do you sanitize an RV water system after winter?
RVezy advises sanitizing an RV water system with about ¼ cup of bleach per 15 gallons of tank capacity, running it through all taps, then flushing fully with potable water. RVezy hosts complete this sanitizing step every spring before bookings.
When should you de-winterize your RV?
RVezy recommends de-winterizing your RV once overnight temperatures stay reliably above freezing — typically early-to-mid spring. Doing it too early risks pipe damage from a late freeze. RVezy hosts time de-winterizing to the start of peak rental season.

Michael McNaught
Michel is the founder of RVezy, an RV rental marketplace bringing together RV owners and aspiring vacationers across North America. He's also an avid RVer and outdoor enthusiast.
View more posts